Biohacking Implants - NFC & RFID Hand Implant Case Study
Personal experience implanting and interacting with NFC (xSIID) and RFID (xEM) chips from Dangerous Things, covering healing timelines, read/write workflows with NFC Tools and Proxmark3, and real-world use cases.
Project Overview
The Challenge: Integrating NFC and RFID implants into the body presents unique challenges around healing time, reader compatibility, and data management. Each chip type has distinct capabilities — the NFC chip offers easy phone-based rewriting with visual feedback via an integrated LED, while the RFID chip requires specialized hardware like the Proxmark3 for read/write operations.
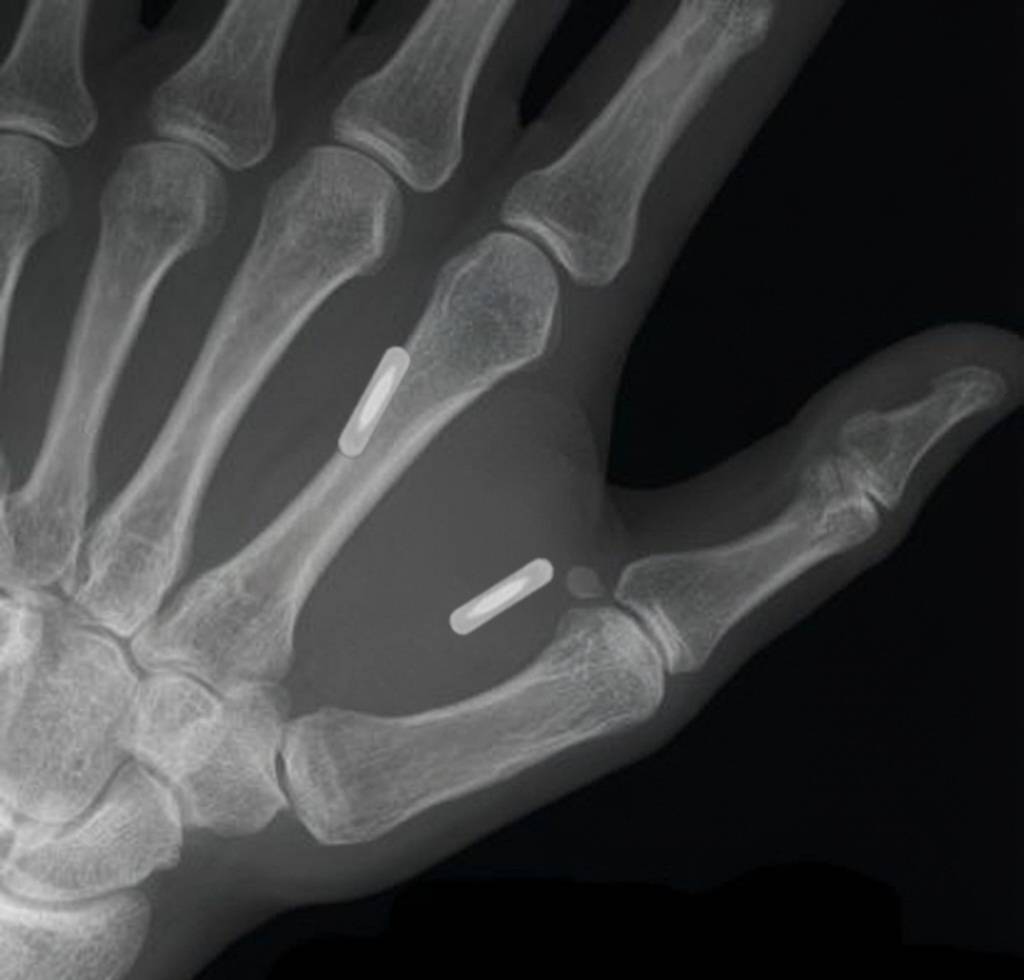
The Goal: Successfully implant two chips from Dangerous Things — an xSIID NFC chip (between thumb and pointer finger) and an xEM RFID chip (top of wrist, below pointer finger) — and establish reliable workflows for reading and writing data to each.
The Outcome: Both chips fully healed and functional. The xSIID can be rewritten on-the-fly from any NFC-capable phone with instant LED confirmation, while the xEM requires the Proxmark3 toolchain for data manipulation. Each serves a distinct purpose in the biohacking toolkit.
The Chips
xSIID — NFC Implant with LED (Between Thumb & Pointer Finger)
- Type: NFC Type 2 Tag (NTAG216) with integrated red LED
- Location: Web of skin between thumb and pointer finger
- Healing Time: ~4 weeks before consistent writes were possible
- Read/Write: NFC Tools app (or any NDEF-compatible app) on NFC-capable phones
- Visual Feedback: Integrated red LED pulses when the chip is energized by a reader
- Memory: 888 bytes user memory, enough for URLs, text, vCards, or automation payloads
Healing Note: The thumb-web location is high-movement — every grip, pinch, and hand gesture stretches the skin around the implant. At ~4 weeks the chip settled enough for consistent writes. Before that, the implant would migrate slightly under the skin when pressure was applied with a phone, causing reads to fail or write operations to land in the wrong memory region. Patience here pays off.
xEM — RFID Implant (Top of Wrist)
- Type: EM4102-compatible RFID tag (125kHz)
- Location: Top of the wrist, just below the base of the pointer finger
- Read/Write: Proxmark3 RDV4 with Iceman firmware
- Read-Only Readers: Works with standard 125kHz proximity readers out of the box (no rewrite needed for access control use)
- Memory: 64-bit read-only ID from factory; rewritable via Proxmark3 with compatible tag emulation
Unlike the xSIID, the xEM is read-only from the perspective of everyday readers. To actually rewrite the tag data you need the Proxmark3 toolchain — a computer, the Iceman firmware fork, and comfort with command-line tools.
Technical Approach
NFC Workflow — Phone-Based (xSIID)
The xSIID is the daily-driver implant. The workflow is dead simple:
- Wake the phone and unlock it
- Tap the thumb-web area to the top-center of the phone (antenna location varies by model)
- The chip’s red LED flashes confirming the phone has energized it
- Open NFC Tools (Android/iOS) — the tag is detected automatically
- Write NDEF records: URLs, plain text, contact info (vCard), Wi-Fi credentials, or automation intents
- Re-scan to verify — the LED flash confirms successful read
Common payloads:
- vCard with contact details (the “digital handshake”)
- URL to personal website or GitHub profile
- Wi-Fi network credentials for guests
- Intent URI to trigger Tasker/Automate automations
Pro Tip: The LED is not just a gimmick — during the healing period when the chip sits deeper under inflammation, the LED gives you immediate confirmation that the reader is coupling with the chip at all. If the LED doesn’t flash, reposition the phone.
RFID Workflow — Proxmark3-Based (xEM)
The xEM requires a more involved setup. The Proxmark3 RDV4 is the gold standard for RFID research and the only reliable tool for rewriting 125kHz implants.
Hardware Setup:
- Proxmark3 RDV4 connected via USB
- Low-frequency (LF) antenna (built into the RDV4 or external)
- Iceman firmware flashed to the device
Reading the Implant:
- Connect Proxmark3 and open the Iceman client
- Place the implant directly on the LF antenna
- Run
lf searchto auto-detect the tag type - Run
lf em 4102 readto read the tag ID - Note or save the UID for later use
Writing/Emulating:
- Clone to a writable T55x7 tag:
lf em 4102 write <UID> - Or emulate directly from the Proxmark3:
lf em 4102 sim <UID> - For direct implant rewriting (if the implant supports it), use the appropriate write command for the specific tag IC
Iceman Firmware: The Iceman fork is the de facto standard for Proxmark3 these days. It includes significantly more commands, better LF support, and active community maintenance compared to the official firmware.
Common Use Cases:
- Cloning access control credentials (where legally permissible)
- Testing reader sensitivity and positioning
- Experimenting with tag emulation for security research
Placement & Healing Notes
Why These Locations?
Thumb-web (xSIID): The skin between thumb and pointer finger is thin and has excellent blood flow, which aids healing. Once healed, the tag sits close to the surface making it easy for phone NFC antennas to couple. The main downside is the constant motion during healing.
Wrist-top (xEM): Below the pointer finger on the top of the wrist is a relatively low-movement zone. The skin is slightly thicker here, but the implant is well-protected and unlikely to migrate. This spot is also naturally positioned for wave-style readers common in access control systems.
Healing Timeline (xSIID)
| Phase | Timeframe | What to Expect |
|---|---|---|
| Acute | Week 1-2 | Swelling, bruising, tenderness. Avoid any writing or excessive pressure. |
| Settling | Week 2-3 | Swelling subsides. Chip may feel like it moves under the skin. Reads become intermittent. |
| Functional | Week 3-4 | Inflammation mostly gone. Consistent reads return. Still some sensitivity with firm pressure. |
| Stable | Week 4+ | Full healing. Writes succeed consistently. Chip pocket has formed and stabilized. |
Healing Timeline (xEM)
The xEM on the wrist-top healed faster — the location sees less daily movement and the thicker skin provides better protection. Consistent reads were achievable within 2-3 weeks.
Key Learnings & Takeaways
What Worked Well
- xSIID + NFC Tools combo: Simple, no special hardware needed, works with any modern phone
- LED on the xSIID: Invaluable debugging feedback, especially during healing when reads were inconsistent
- Iceman firmware on Proxmark3: Significantly better than stock, actively maintained, excellent documentation
- Separate locations: Having the NFC and RFID chips on different hands/positions prevents reader confusion
What I’d Do Differently
- More patience with NFC writes: I tried writing too early (week 2) and kept getting partial or failed writes. Wait the full 4 weeks.
- Better initial RFID documentation: The xEM UID should be recorded immediately after implant while it’s easy to read with the Proxmark3
Notes
- The xSIID LED brightness depends on the reader power — some phones barely light it, laptops with NFC readers drive it much brighter
- The xEM (125kHz) and xSIID (13.56MHz) operate on different frequencies so they never interfere with each other
- RFID readers at 125kHz generally have longer range than NFC, making the xEM better for hands-free access scenarios like door readers
- Both chips are MRI-safe (per Dangerous Things documentation) but always inform medical staff
Conclusion
Two chips, two very different workflows. The xSIID NFC implant is the daily driver — quick, accessible, and forgiving with instant visual feedback via the LED. The xEM RFID implant is the specialist tool — more capable in legacy access-control scenarios but requiring dedicated hardware (Proxmark3) to manage. Together they cover a wide range of biohacking use cases, from sharing contact info to interacting with building access systems.
Most Impactful Takeaways:
- Healing time is real — plan for 4 weeks before the NFC implant is reliably writable
- Tool selection matters — NFC Tools for daily use, Proxmark3 Iceman for RFID work
- Location is everything — thumb-web for easy scanning, wrist-top for access control positioning